Thursday, November 27, 2008
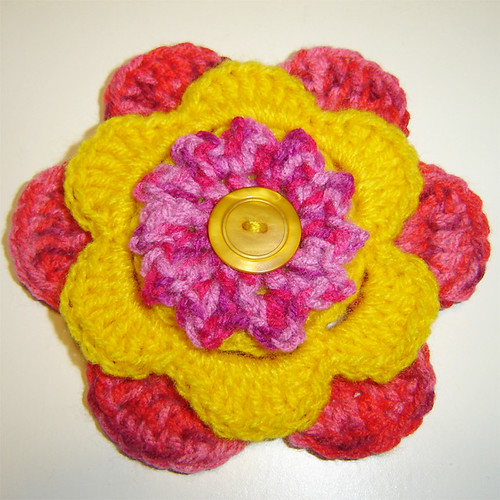
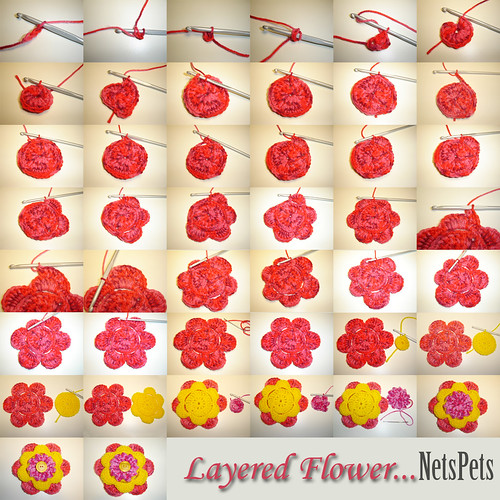
Crocheted Layered Flower - VIDEO TUTORIAL
I have blogged this before as a series of still images and written instructions here: Layered Flower .
*******UPDATE MARCH 2009 --->>>> CHECK OUT MY NEW TUTORIAL HOW TO CROCHET A LAYERED FLOWER - VIDEO ***********
Monday, November 17, 2008
What an AMAZING PEAR!!!
I can't help myself! I bought a bag of pears, and this one was inside!!! ;-)
Saturday, October 25, 2008
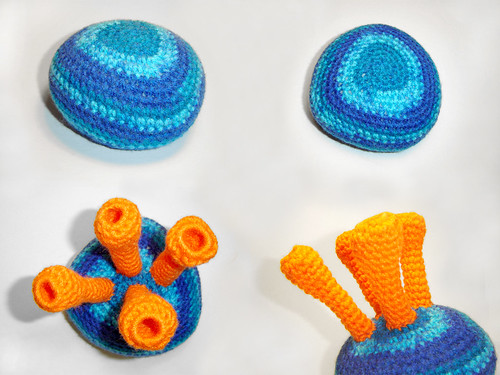
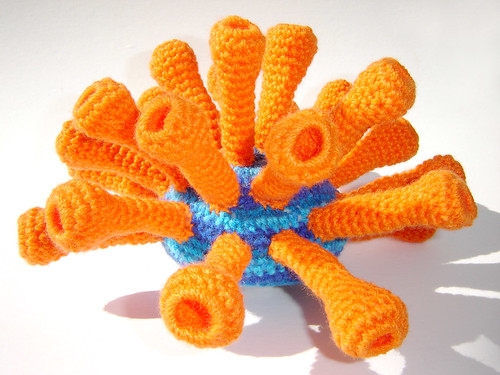
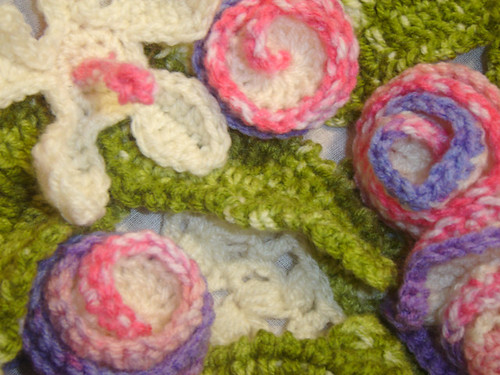
Crochet Coral Pebble
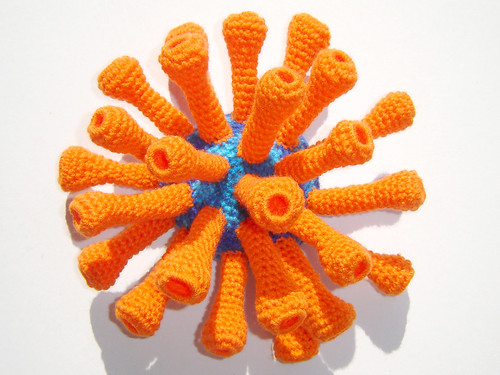
This is a piece I finished about a month ago. I wanted to create an underwater, coral piece. An imaginary organism, and have some fun with the colours too.

I began with a couple of the tendrils in orange as they worked so well. I realised I was going to need a 'base' for them to sit on, so I set about making a 'pebble'. The way I imagined this piece was a lot more densely packed, so the look of the base didn't seem as important originally. I'm glad I decided not to cut this corner and make a nice base, as most of it remains visible.

Friday, October 24, 2008
Life without deadlines (from Gooseflesh)
I went to see Helle Jorgensen's exhibition today! How exciting to see her work in person. Her craftsmanship is of the highest quality and to be admired. It was inspirational see her work up close and the fine stitches she uses in her art. (see link below)
Life without deadlines
Posted using ShareThis
Life without deadlines
Posted using ShareThis
Saturday, October 18, 2008
We all need an Angel

Well sometimes we just need a little help from above, when times are tough. So when you crochet a triangle - what a cute way to finish it off, by turning it into an Angel?
Done in DC (US = single crochet)- about 15 stitches. I then decreased at the beginning of every row, til I got to one stitch. I then DC (SC) stitched down each side of the triangle. To make the frilly hem on the bottom of the skirt, in each stitch:
DC(SC) then Half Treble(Half Single Crochet) then DC(SC) - repeat til the end of the hem. This gives the scalloped effect.
The face is a simple spiraled circle done in DC (SC), til about 3cm (1 1/2 in), a couple of whip stitches will hold it to the body. The Angel 'wings' are spaced like so:
attach yarn near 'neck', then miss 2 stitches, into the same stitch crochet 8 Trebles (Double Crochets) then miss 2 stitches and anchor wing with a single crochet. Repeat on other other side for opposing wing.
The hair is made from short lengths of yarn, (About 2-3 inches - 6-7 cm) in length - then 2 lengths are knotted through a stitch on the edge of the face (circle). I frayed the yarn to give it a more frizzy look.
Eyes are completely up to you. I was going to use fabric paint, but couldn't find any black, so I used little dome buttons instead. The buttons on the hem are an embellishment that finish it off nicely. If you make one, I'd love to see it, leave a comment or link to your Angel! (and a link back to this post would be appreciated too! Thanks...happy crafting!!
Monday, October 6, 2008
A Blue tongue lizard in the backyard!
This little guy had a slow walk along the back pathway today after scaring off our cat Milly! She acted tough but decided to be cautious and run away after seeing this native lizard [Tiliqua scinoides] aka "The Blue Tongue Lizard". Completely harmless, it is not an uncommon site in Australian backyards. If you are interested: More about the Blue Tongue Lizard.

Sunday, September 28, 2008
A visit to the Aquarium.
Late last year I took the kids to the Sydney Aquarium. I had a field day with my camera. I took so many pictures and videos that I was suprised to see just how many came out. I just love making little videos of such outings - as it makes these times memorable. If you take a little extra care, it can be interesting to many others as well! I hope you enjoy.
Tuesday, September 16, 2008
I'm on a Hyperbolic roll again!
Well...it had to happen sooner or later. I hadn't made any Hyperbolic Crochet for quite some time and I was missing the fun of creating these forms. If you haven't tried it yet you must! Have a look at the Institute for Figuring to get some background information, it's fascinating!

This is a multi-coloured Hyperbolic form, that I created by using 8ply yarn with a 4.5mm hook. I went with a bright centre, and had good advice to have a white 'rim' as a contrast. What amazes me is how the colour almost totally disappears when just one row of white is added.


I used a simple DC (Double Crochet = US Single Crochet) stitch, and increased every 2nd stitch. This made the form crenellate quite quickly, each row takes around 50% longer to complete than the previous row.
Here is another form I just finished, it's not as crenellated as the rate of increase I used was 1 in 3 stitches.


Sunday, August 31, 2008
The Eye has it - A crocheted eyeball!

Well it had to happen sometime! Somewhere in the deep dark recesses of my mind, this crazy idea popped into my head, and I just had to make it!

Purely for fun, as I can see no earthly use for it apart from a conversation starter ...or stopper, however you'd like see it!!

This "eye" is complete with "optic nerve", just to be as as anatomically correct as possible.

So....Get out your crochets hooks, your yarn and delve into the deeper, darker side of your craft psyche...you never know what you can make!!
"HERE'S LOOKING AT YOU!!!"
GO FORTH AND CRAFT... ;)
Monday, August 18, 2008
Got winkles? Get a Stermer!

Well, maybe if you have "winkles" you could buy this "stermer" as I did! So I am now safely "winkle free" - for now. (see picture)
I also had to tell all old people near me to "back off!" - you are not allowed to operate my stermer!! You'll have to find another means of eradicating your winkles.
Monday, August 11, 2008
Crochet a Bubblegum Pouch gift!

How cute and fun is this? So my daughter's friend has been so sweet and considerate lately that I thought how nice it would be to make her a little thank-you.
I chose bubblegum coloured yarn (8ply) and a size 5mm hook (US - 8 - H). Crochet DC (single crochets -US) in the round increasing every 5 - 6 stitches until you have the desired base size (Approx 2-3 in or 5-7cm in the picture). Then stop increasing, this will make the "walls" of your little bag. After about 2 inches / 5 cm I started to decrease, about 1 every 8 stitches, to bring the top of the little bag in - just a bit!
Then you need to create spaces for the ribbon to be fed through. I simply crocheted into the next stitch, then chain one, miss one stitch then crocheted into the next stitch. repeat around edge of bag.
For the ribbon, I used 2 lengths, about 30 cm / 12 in works well to start and trim excess off.

This pouch is so simple to make, it would make a great party favour or suprise gift. Make it extra special, by popping something like sweets inside. Happy crocheting!
Tuesday, June 24, 2008
Tutorial - Crochet a layered flower.
Crochet a Flower Garden!
Why not? You have the yarn; you have the skills...do it! I call them layered flowers because they are made up of "layers" of crocheted 'rounds'. Simply collect some yarn (you don't need much) that goes nicely together.
If you have a basic understanding of crochet stitches, then it's best to start with a chain of 3 joined in a loop with a slip stitch. Make the first "florette" the largest in diameter, a simple one (as they are best made-up as you go) is to crochet into the centre of your loop 12 trebles (or US I think double crochets) this will give you a small circle about 2 1/2cm (1 inch) in diameter. Then add a row of; 1 single crochet, then 4 chain, then single crochet into the 4th stitch. Repeat till you have created 6 “buttonholes”.
Next row, petals. Each petal consists of “1 single crochet (DC), 1 half double crochet (half treble), 5 double crochets (5 trebles), 1 half double crochet (half treble), 1 single crochet (DC)”
*Note – this is where the 2nd “layer” ends. To make the biggest florette (layer) read on!
[Aust. Treble = US double crochet
Aust. DC = US single crochet] (confusing huh?)
Last row!! Each petal has 9 stitches now (7 “gaps”). I slip stitch 2 stitches between each petal, but whatever works for you best. The trick between petals is not to add any bulk/height.
Each petal: Into
1st stitch: 1 single crochet (DC).
2nd stitch: 2 half double crochet (half treble).
3rd stitch: 2 double crochets (trebles).
4th stitch: 1 double crochets (trebles).
5th stitch: 2 double crochets (trebles).
6th stitch: 2 half double crochet (half treble).
7th stitch: 1 single crochet (DC).
Repeat for each of the 6 petals. Finished!!
The centre “medallion” – is also worked the same as the centre of the petals. 12 double crochets (trebles). Then the 2nd row is worked as follows into each of the 12 gaps:
1 single crochet (DC)
1 half double crochet (Treble)
2 chain
1 single crochet (DC)
Repeat into each gap of the 12 stitches.
This forms your little “peaks”. All finished. Layer your petals on top of each other, and choose a pretty bright button and stitch your “layers” together. Your own, layered flower!!
(Note – In Australia the names of crochet stitches differ from the US and other countries. I have tried to write them correctly for both, please drop me a line if any of my instructions are unclear.)
*** UPDATE ***
I have made this into a video tutorial on my blog, HERE.
Sunday, June 8, 2008
Making A Difference
I like to think that I am fortunate in this life to have shelter, food, education, healthy children and the opportunity to see the wonders in the world around me. When I found out about BOINC (Berkeley Open Infrastructure for Network Computing), I discovered that my humble computer could combine with others around the world to provide "Combined computing power". What's that all about? Well, to quote Wikipedia:
"The Berkeley Open Infrastructure for Network Computing (BOINC) is a non-commercial middleware system for volunteer and grid computing. It was originally developed to support the SETI@home project before it became useful as a platform for other distributed applications in areas as diverse as mathematics, medicine, molecular biology, climatology, and astrophysics. The intent of BOINC is to make it possible for researchers to tap into the enormous processing power of personal computers around the world."
Now, I'm no computer programmer, I like and use computers for many reasons, though I feel being able to use my computer to help scientists around the world with anything from cures for cancer, to understanding the Universe around us or climate prediction has to be more worthwhile than having a screen saver turning over. The best bit about all this - you don't have to be an expert in computing, your computer does that for you!
Check out BOINC.
Wednesday, June 4, 2008
Sundaes for 2...

Well my 2 little darlings were well enough behaved today to earn a Strawberry sundae each! They love the fancy glass and not to mention the ice-cream, strawberry topping, milk and whipped cream helps with the appeal!!
Better than a bought one...now...how can I turn these into crochet? ;-)
Wednesday, May 28, 2008
A little flower garden...

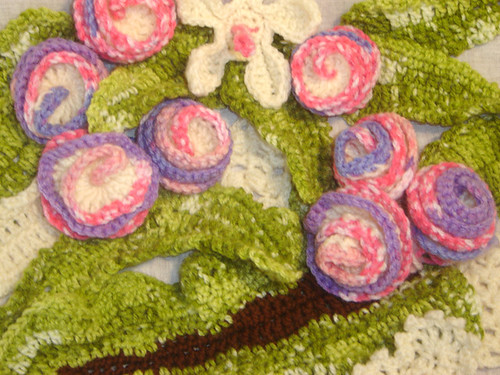
Well, those flowers are addictive but so sweet! The fun you can have with colours is endless. I arranged this little flower garden to show off my leaves and flowers that I've been making of late.
Wednesday, May 21, 2008
Crocheted Chenille Rose

Whilst browsing through You-Tube tutorials on new crochet ideas (I love to be inspired!) I found Teresa's crochet tutorials - they are great and I recommend that you check them out HERE.
I found her flower / rose tutorial amazingly clever in it's simplicity and isn't that what we're all after? I chose a baby pink chenille yarn - and a variegated green yarn for the leaves. I think this would make a lovely highlight on a bag, girl's hat or even a throw.
Monday, May 19, 2008
Awesome Lava Sculpture
This is an amazing video. An Artist molding a sculpture straight from a lava flow!
Monday, May 12, 2008
My beautiful Yarn 'Bouquet'.

It was my birthday a few weeks ago, to my surprize and delight my friend arrived at my door with this lovely 'bunch' of yarns!! I have to confess I squealed as it was so lovely and exciting.

So original and fun, I immediately thought of what I would make. An Autumn toned throw. I wanted to try something new, so I found by chance a nice shell stitch. Without the complete pattern and only a few guidelines, I was able to work the stitch out. I cast on 253 stitches (42 lots of 6 plus 1). Here is the throw so far, I've used almost 5 of the 10 100gram balls.

A detail of the Shell stitch:

I'm planning to make a video on how to do this shell stitch, watch this space.
Tuesday, April 29, 2008
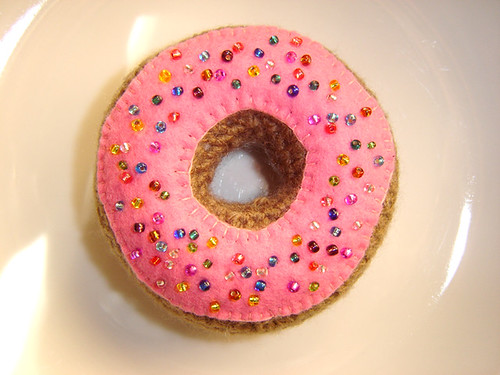
The wonderful world of craft!
Hey there readers! I've been a busy little crafter - and thought you'd like to have a look at some of my latest creations. I used an 8ply acrylic yarn in brown. I started with a small chain loop, then single crocheted around increasing and decreasing till I achieved the desired shape. I used polyester fibrefill, and stitched it closed (in the centre). Here is a treat for your eyes, not your stomache!!

Even Milly got in on the act! (Where's mine?)
I'm also working on a new little "How-to" video for YouTube. It's a simple and effective crochet "shell" stitch. Bye for now!
Even Milly got in on the act! (Where's mine?)
I'm also working on a new little "How-to" video for YouTube. It's a simple and effective crochet "shell" stitch. Bye for now!
Saturday, April 19, 2008
How to Crochet a Pen Holder
Here is my new How to video on YouTube, "How to crochet a pen holder" - Have a look. I've tried to make it as simple and fun as possible. It's about fun - so change things up, and crochet! :)
Wednesday, April 16, 2008
Forgetfulness
You know, I was just talking about this to my sister, forgetfulness. It sounds like a disease to be "fixed", it can sometimes be just that. But what if it's just about being a little older, and a little wiser? What if we're meant to be a little more forgetful as we get older? Perhaps we are streamlining our thoughts and just getting rid of the mental clutter, before it has the opportunity to override a nice thought like "mmmm...that smells good" "look at the waves on the shore" or "I love you, thanks for being in my life". When I walk into a room and forget why, I try to let it go. Perhaps I was meant to notice the nice day or a child's drawing instead. Cherish what is seen and felt, not forgotten.
>> Animated poem by Billy Collins <<
>> Animated poem by Billy Collins <<
Monday, April 7, 2008
Anyone for Chocolate Cake?


Well, wanting to push myself a little further with my knowledge of crochet stitches, I taught myself the "Popcorn" stitch. Then of course my first thought was, this would make a great slice of chocolate cake! Enjoy! Oh yea...NO calories, so it's guilt free!
Sunday, March 23, 2008
EARTH HOUR! Sign up and make a difference.

I just signed up to Earth hour. Visit here http://www.earthhour.org/user/5w5j
and sign up to help reduce the impact of global warming. It's a good place to start, then spread the word!
Tuesday, March 18, 2008
Gold Hyperbolic Crochet

I've made another hyperbolic form...I think I'm addicted! I bought a nice 4ply gold mercerised cotton, and using a 2mm needle, I increased 1 in every 2 stitches. Here it is in the making!!
Sunday, March 16, 2008
Finished at Last!! Hyperbolic Crochet...the Video
I finished the Pseudosphere - down to the last thread. As this is a 1 in 3 increase, I'm interested to try some different colours, and increases. I hope you enjoy the video, please feel free to pass the link onto others!
Thursday, March 6, 2008
Yeah! It's posted!
Today I posted my first Hyperbolic Crochet to The Institute for Figuring in L.A., it's on a long journey from Down Under, but it's exciting to be part of such an amazing and exciting project. I'm hoping to be able to see some photos from the exhibit.
I started a new Hyperbolic Crochet, fine cotton on a 2mm crochet hook. It is very sweet and the ice-cream colours look great!!
Here are some photos of the progress of the "pseudosphere":
I started a new Hyperbolic Crochet, fine cotton on a 2mm crochet hook. It is very sweet and the ice-cream colours look great!!
Here are some photos of the progress of the "pseudosphere":
My First Post
Hi there. Well I'm joining the Blogging ranks, and from what I've seen - I'm impressed by the talents of Bloggers everywhere! I hope to share my creative journey here. Tracking the creative process from concept to creation (and critique).
Today I was excited to complete a project I started a few months ago, and had put to the side for too long. Hyperbolic Crochet caught my attention - it excited the creative process, with a mathematical flavour, just enough for me to understand! The Institute for Figuring is a fascinating site for the avid crocheter who isn't afraid of a little brainfood. Yum.
Here are the photos of my FIRST Hyperbolic crochet, process and completion.
 Here is a detailed photo, showing the crenelations that are achieved from Hyperbolic Crochet, and a constant rate of increase. In this case, 1 in 3. In this case each 'row' increases by 33 1/3 % on the previous row!!

Today I was excited to complete a project I started a few months ago, and had put to the side for too long. Hyperbolic Crochet caught my attention - it excited the creative process, with a mathematical flavour, just enough for me to understand! The Institute for Figuring is a fascinating site for the avid crocheter who isn't afraid of a little brainfood. Yum.
Here are the photos of my FIRST Hyperbolic crochet, process and completion.

 Here is a detailed photo, showing the crenelations that are achieved from Hyperbolic Crochet, and a constant rate of increase. In this case, 1 in 3. In this case each 'row' increases by 33 1/3 % on the previous row!!
Subscribe to:
Comments (Atom)